Microsoft Project Server 2019 Available Now!

ProjectServer2019
Microsoft Project Server 2019, our on-premises, end-to-end project and portfolio management solution, is available as of Monday, October 22, 2018.   Its enhancements include performance, scale ability, reporting, and accessibility and an expanded set of resource engagement APIs. Project Server 2019 continues to provide your organization with the robust collaboration capabilities powered by SharePoint Server 2019.

Download Project Server 2019 here to get started today!

Resources

Estimating Annual Budgets using Project Online/Server

As we all know, Project Online/Server (PWA) does a great job with managing project schedules and resource loads; however, can PWA manage other company process when we stretch the PMO into taking on more roles? For example, several of my previous clients have used PWA to estimate next year’s annual budgets. This article takes a quick look on how PWA can be used to roll up departmental budgets and improve on the capturing of the real resource load across a whole organization.

Let’s first look at what project center looks like when departmental budgets are loaded into PWA. Then, we’ll walk back and see how to accomplish this. Note that the same project center view shows next year’s budget (2019) rolled up for all the departments in the organization. In the example below, the company only has three departments, but the concept works for as many departments as are required.

The project center view is grouped by year. Because of this, we can roll up the plan costs for all the departments. The blank year displays current projects that are in process— some of them across multiple years. These are current projects not involved with the budget. Year 2019 shows the day to day (D2D) schedules. You might wonder what that means. It will be discussed later, but basically it captures non-project work for those people not on a project. For example, D2D 2018 IT schedule, which captures work business as usual work from a DBA or help desk person.

Year 2019 is the roll up of all the departments for next year. This is accomplished by having each department or business group create a staff schedule with any additional fixed expenses. The screen shot below shows what a schedule may look like. There are many ways to do this. My preference is to set up each staff member as a summary task and include big pockets of time showing their main activity. For example, Teresa Black is estimated to spend 1400 hours on projects, 500 hours on design and questions outside of her projects, and 100 hours on administrative activities. The hours add up to about 2000. Close enough for me; however, based on your requirements, you may want a more accurate accounting of hours.

You may have a circumstance where you wish to add two additional people for next year. The same kind of hourly planning can be added to that schedule.

Finally, utilizing fixed costs or cost resource options can be used to capture other costs and overhead. This would bring your budget in line and provide an accurate picture of what you are asking for for the following year. As I said before, this is just one of many ways to create a budget with PWA. Of course, you’ll want to include enough details to make good decisions on what is required or to be cut for next year’s budget.

Once the D2D schedules are completed, they can be revised and several iterations can occur until the final budget is approved. Wow! This makes budgeting easy for next year, and could be the end of article, but it’s not!

There are many more benefits beyond just budgeting to this approach for both the PMO and the company as a whole. Resource load is more accurate for all resources throughout the year, and using PWA time-sheets can be a good replacement for primitive or expensive time tracking systems. Let me explain.

By capturing the day to day schedules of all resources for the year, the project and resource manager have a better view of what the actual resource load looks like. For example, the DBA may spend half their day doing maintenance leaving them with only 20 hours a week for working on projects. The diagram below shows a more accurate picture of resource workloads when using D2D schedules.

Once the schedules are published, there is a good reason to start using the PWA time sheet system or at least removing an old-time tracking system. The PWA time-sheet can be configured to use charge code and capture where time is really going. It also has a robust approval system. See an example below of a simple time-sheet showing a few day to day items. Another bonus is entering vacation time and capturing the impact of such on project schedules.

In summary, when using PWA to estimate next year’s budgets, we have killed three birds with one stone:

  • The company has a better way to estimate annual budgets each year.
  • The PMO has better view of resource workload for the year.
  • The PWA Time sheet system allows for the replacement of outdated time sheets, making time tracking easier to manage by department.

I hope you will join me for my upcoming webinar on this topic, as we’ll explore more fully the in’s and out’s of implementing the process I have suggested here.

Speaking PMI Chapter Meeting, Oct 2, 2018 Agile is not Always the Right Answer

Would you use the agile approach to build your house or have your government build missiles using agile?  How to Determine the Right Scheduling Approach for your Project

Agile is an adaptive approach to managing projects, however there are many other predictive scheduling approaches that may work better. This session covers the strengths and weaknesses of Agile, Critical Path Method, Resource Critical Method, Critical Chain, Earned Value and Earned Work approaches and how to determine which approach works best for your project management needs.  This topic is based on the research of Eric Uyttewaal, who is also the author or Forecasting Programs, Critical Path 2.0 and Forecast Scheduling 2013 and 2016.   After this session, you can choice the best tool for managing your project.

Link to more information: Click Here for PMI Chapter Meeting Info

PIC Mattrix

Speaking SQL Saturday Atlanta, Sept 22, 2018

Create IaaS SQL Server Test Premise Environment in Azure Cloud

Speaker: Michael Wharton
Duration: 60 minutes
Track: Cloud Application Development & Deployment
Level: Intermediate
Why create a SQL Server Test premise environment in Azure cloud? One of the first steps into moving to Azure cloud, is building an environment that looks a feels like premise but only in the cloud. This session is an overview of getting started with basics of Azure environment, such as Accounts, virtual networks, Storage and creating virtual machines.. Once we fly by reviewing several building blocks, we then build Active Directory VM, SQL Server VM and App Server Tier VM using Azure portal and PowerShell.
You may ask what does this have to do with project?  Its a foundation for building a TEST Project Server in Azure.  The savings is that you only pay for when its needed. Things like SharePoint patches or software development.
SQL Saturday Atlanta

Window Server patch breaks SharePoint

Ouch!  A windows server security patch of the .NET Framework can break SharePoint.  The following link goes into details about the security patch its effect.

Click link for more details about patch and fix

RedmonServerDown

Microsoft does not have a fix for SharePoint. I recently had a customer apply the patch and then removed the patch.   This doesn’t work but worth a try.   The only option for recover is to restore the windows image from a previous backup.  It a good practice to always back up the windows image before applying patches.

Here is my suggestion

  1. Windows server image backup of all the servers and all SharePoint databases.
  2. Apply patches
  3. Run SharePoint Configuration Wizard on each server.   This is often overlook by window server engineers because they don’t understand that patches really don’t get applied to SharePoint until the wizard is run
  4. Test and verify SharePoint.

Hopefully patches work and SharePoint is running.  If not, the backups can get you back to your happy places.


Installing SharePoint 2019 (Public Preview)

Before running Project Server 2019 can be tested and reviewed, SharePoint Server 2019 must be installed.   On July 24, 2019 Microsoft announce and release the SharePoint 2019 Public Preview.  Click here to download SharePoint 2019 Public Preview.

Installing the public preview is relatively simple process.  Install a either Windows Server 2016 or 2019 on a VM or physical server.  I like using Azure VM because there is a SQL Server 2016 running on Windows server 2016.   If not using Azure VM, then SQL Server 2016 or 2017 also needs to be installed.

Once the windows server is setup, then download installing bits, install SharePoint and run the SharePoint configuration wizard.   This is works great for quick get me started. I use PowerShell script that does the same thing as the SharePoint Configuration wizard.  The reason for the script is that I can name the SQL databases and the Wizard doesn’t allow for this.  Link to MyProjectExpert ProjectServerTools   Download for PowerShell configuration wizard. I left my notes inside the PowerShell to remind me of what some of the functions do.

Another tool that I recommend for installing SharePoint 2019 Public preview is AutoSPInstaller Online. Link to AutoSPInstaller   Its a great tool and at the time of this writing, it may not have all the functionality for SharePoint 2019, but I am sure its coming.

Migrating Project 2016 to Project 2019

I will be speaking on migration from SharePoint/Project Server 2016 to 2019 at the SharePoint Saturday in Charlotte August 11, 2018.

Migrating from SharePoint 2016 to 2019 is not going to be to difficult as previous SharePoint Migrations. The session goes over reviewing the requirements and looking at options for cleaning up SharePoint sites and web applications and then goes thru steps with migrations from 2016 to 2019 and using PowerShell to make it easier and more predicative

Click link for more information at SharePoint Saturday in Charlotte, NC

Click link below for my PowerPoint presentation that contains slides and scripts.

2018-08-11 SharePoint 2019 Upgrade V6

.


Limited PowerApps Features for Project Online

There is a lot of excitement about PowerApps and how it is designed for non-programs to build apps.   Yes, it can create basis phone apps based on SharePoint list, however I am a little disappointed in the features available with project online.  That is what this blog is about. I wanted to see what I can do for me when using Project Online.  In a word, I believe it is weak and doesn’t provide many useful features.  However, I am optimist that Microsoft will be adding to the Power App library for project online.

My initial reason for digging deeper inside the PowerApp tool was that I had a client who wanted the project online time sheet feature setup with Power Apps. Project online  was being evaluated and several other competitors and admit the competitors user interface was much easier to work with however they didn’t have all the powerful features found in project online.  I assume Power Apps could build an interface to to project online time sheets. As I explored Power Apps capability, I realized that it wasn’t there.  Paul Mather blog provides a work around for export PWA into SharePoint list and then building power apps from the list.  Very clever, however updates do not go back into PWA database

PowerApps usually start with a home page.   Figure 1 shows the basic functionality provided when using project online. The basic features are 1) List projects, 2) Create project, 3) Create Resources, 4) Listing tasks, 5) check in and publish projects and 6) checkout projects.  Displaying Power Bi reports is a supper feature but it is really just a standard Power App.

Figure 2 shows a simple list of projects.  Project list provides a pathway for listing tasks once a project is found and selected from list.  Project List page is create by using ProjectOnline.ListProject function which is a connection function for retrieving list of projects.

Figure 1. PowerApp home page     Figure 2. Project List

The next two functions that are available is CreateResource and CreateProject. As it can be seen in Figure 3 and 4, there are few parameters that are based to project online.  I am not seeing a whole lot of value at this point in time, however I believe the number of fields and functions will grow in the future.

Figure 3. Create Project            Figure 4. Create Resource

Figure 5 shows Task List feature listing all the tasks for a project. The feature doesn’t provide a method for updating task in the field.  Again, maybe in a future release but not much for now.  Figure 6 shows Power BI reporting page and I see a lot of potential with this aspect of a project PowerApp.

Figure 5 List Tasks                         Figure 6 Power BI reports

All-in-all it looks like a good first step and look forward to seeing Microsoft building many more function calls that will enable developers bring project online closer to the PMO fingers tips.


Rebooting the Project Management Office (PMO)

The PMO much like a computer becomes ineffective and inefficient over time and sometimes requires a reboot.  Rebooting a computer resets the system, clears out cache, releases memory and updates drivers.  Once the computer system is back up and running it runs faster and more efficient. The PMO often needs a reboot as well.   The PMO’s process become stall and outdated, executive management have come and gone, people are asking why are we doing it this way and newer software has been release over the years.  And over time the PMO becomes ineffective and needs a reboot as well.
The average lifetime of a PMO is about five and half years.  This sad fact actually makes sense as well.  Think about what has happen in five years after a PMO launches.  Executive management and sponsors have probably been promoted, left the company or perhaps retired, which means someone else has inherited it.  Processes and procedures have become stall and ineffective over time. The PMIS (Project Management Information System) lacks the latest features and hasn’t kept up with the latest enhancements. Project managers are incorporating agile into their processes creating chaos and confusion.  The original vision and purpose of the PMO has changed over time.  The PMO role and reach may need to expand and align with human resources or contract management.   It’s clearly evident that many events can occur in the past five years and instead of letting the PMO continue to become ineffective, perhaps it just needs a reboot.

What does it mean to reboot the PMO?   It really simple.  It’s just a matter of revisiting the vision and purpose of the PMO and ensure that it still aligns up to it business’s mission.  Realignment of the PMO may include some of the following steps below:

  1. Verify PMO executive support
  2. Write a PMO reboot plan and schedule
  3. Review the PMO vision and core values
  4. Review the PMO scope such as portfolios, program and projects
  5. Review the PMO maturity model.
  6. Review the staffing and resources required for PMO
  7. Review PMO training, mentoring and coaching
  8. Review PMO mythologies and processes
  9. Review PMO reporting meeting management requirements
  10. Review PMO standards for reporting
  11. Review PMO security and access permissions
  12. Review PMO tools, project and PMIS software

The last step is the main point of my blog; the review of PMO tools, project and PMIS software.  Companies often upgrade project server to a more current version without thinking about ​rebooting the PMO.  In many cases the project server upgrades are done without reflecting on what has changed over the years and how the new features can be incorporated into the PMO.

Personally for me, I think Microsoft Project server solution is the right solution for many companies, however, before spending money on upgrade, maybe it’s a time to bring in another PMIS solution.  Or perhaps it’s the right time to expand the maturity of the PMO and incorporate the other project server features such as timesheets, resource engagements, portfolio management or workflow to name a few.

In summary, every​ five years is a good time to reboot the PMO and make grow the maturity of the PMO.​

Project Server 2016 Provision Menus Are Gone


What happened to the options creating, editing and viewing the PWA in project server 2016?  Below is a screen shot of creating a project web app instance in SharePoint 2013.

ManageProjectWebApps2

Now look at the options in SharePoint 2016.  Notice they are missing except for manage.

ManageProjectWebApps

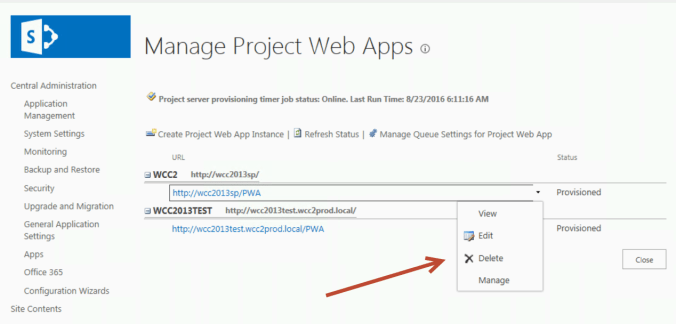
What this now means is that the easy to use menu driving procedure of creating and managing PWA instances is now history.   PowerShell is the way it is done now.   I really like PowerShell, but really wish Microsoft would keep some of the menu options. Rumor is that everything is going the way of PowerShell.
Here are a few PowerShell scripts that provides the same functions as before:
#######################################################
# Author: Michael Wharton
# Date: 08/30/2016
# Description: Project Server 2016 configuration
#    Create one or multiple PWA sites
#######################################################
Set-ExecutionPolicy -ExecutionPolicy Unrestricted -Confirm:$false -Verbose
Add-PSSnapin Microsoft.SharePoint.PowerShell -ErrorAction SilentlyContinue  -Verbose
#######################################################
#  Update the following metadata that is used consistantly thru the script
#######################################################
<$SqlServerName        = “LAB-2016SP.DOMAIN.LOCAL”
$WebAppURL            = “http://LAB-2016SP.DOMAIN.LOCAL&#8221;
$SitePwaURL           = “http://LAB-2016SP.DOMAIN.LOCAL/pwa&#8221;
$WebHostHeader        = “LAB-2016SP.DOMAIN.LOCAL”$WebAppURL            = “http://LAB-2016SP&#8221;
$SitePwaURL           = “http://LAB-2016SP/pwa&#8221;
$SitePwa2URL          = “http://LAB-2016SP/pwa2/PMO&#8221;
$SitePwaOOBURL        = “http://LAB-2016SP/pwaoob”$WebAppName           = “Project Server 2016”
$ProjectServiceApp    = “Project Service App”
$ProjectServicePool   = “Project Service Pool”
$WSS_ContentDB        = “LABK_PWA_WSS_Content”
# Create credentials
$ServiceSP            = “DOMAIN\ServiceSP”
$ServicePass          = “password”
$credServiceSP  = New-Object System.Management.Automation.PSCredential -ArgumentList @($ServiceSP,(ConvertTo-SecureString -String $ServicePass -AsPlainText -Force))
################################################################
# create Managed Account
New-SPManagedAccount -Credential $credServiceSP -Verbose
################################################################
# Create Project Service Pool
New-SPServiceApplicationPool -Name $ProjectServiceApp  -Account $ServiceSP -Verbose
################################################################
#  Create Project Server Service and Enable Project Key
$ProjectServiceID = New-SPProjectServiceApplication -Name $ProjectServiceApp -Proxy -ApplicationPool (Get-SPServiceApplicationPool $ProjectServicePool)
Enable-projectserverlicense -Key “23CB6-N4X8Q-WWD7M-6FHCW-9TPVP”
#################################################################
# Create Web Application on root that contains project server collection
#################################################################
$AP = New-SPAuthenticationProvider -Verbose
New-SPWebApplication -Name $WebAppName -port 80 -URL $WebAppURL -DatabaseName $WSS_ContentDB  -ApplicationPool $ProjectServicePool   -ApplicationPoolAccount (Get-SPManagedAccount $ServiceSP) -AuthenticationProvider $AP -Verbose -Confirm:$false
# Create PWA on Root
New-SPSite -Url $WebAppURL -Template “PWA#0” -Name “Project Web App” -OwnerAlias “DOMAIN\mawharton” -Verbose
Enable-SPFeature PWASITE -Url $WebAppURL -Verbose
Set-SPProjectPermissionMode -Url $WebAppURL -Mode ProjectServer -Verbose
# Add a few resources and make basic configuration updates such as publish sites
Start $WebAppURL
###################################################
#  Create multiple PWA sites
$SitePwaURL           = “http://LAB-2016SP/pwa&#8221;
$SitePwa2URL          = “http://LAB-2016SP/pwa2&#8221;
$SitePwaOOBURL        = “http://LAB-2016SP/pwaoob&#8221;
###################################################
# Create Root
New-SPSite -Url $WebAppURL -Template “STS#0” -Name “Root” -OwnerAlias “DOMAIN\mawharton” -Verbose
# Create PWA Site as managed path
New-SPManagedPath “PWA” -WebApplication $WebAppURL -Explicit
# remove-spmanagedpath “PWA”  -WebApplication $WebAppURL
New-SPSite -Url $SitePwaURL -Template “PWA#0” -Name “Project Web App” -OwnerAlias “DOMAIN\mawharton” -Verbose
Enable-SPFeature PWASITE -Url $SitePwaURL -Verbose
Set-SPProjectPermissionMode -Url $SitePwaURL -Mode ProjectServer -Verbose
Start $SitePwaURL
# Create PWA2 as second site
New-SPManagedPath “PWA2” -WebApplication $WebAppURL -Explicit
New-SPSite -Url $SitePWA2URL -Template “PWA#0” -Name “Project Web App2” -OwnerAlias “DOMAIN\mawharton” -Verbose
Enable-SPFeature PWASITE -Url $SitePWA2URL -Verbose
Set-SPProjectPermissionMode -Url $SitePWA2URL -Mode ProjectServer -Verbose
Start $SitePWA2URL
# Create PWAOOB as second site (Out-Of-Box)
New-SPManagedPath “PWAOOB” -WebApplication $WebAppURL -Explicit
New-SPSite -Url $SitePwaOOBURL -Template “PWA#0” -Name “Project Web App OOB” -OwnerAlias “DOMAIN\mawharton” -Verbose
Enable-SPFeature PWASITE -Url $SitePwaOOBURL -Verbose
Set-SPProjectPermissionMode -Url $SitePwaOOBURL -Mode ProjectServer -Verbose
Start $SitePwaOOBURL
# Create PWA2 as second site
New-SPManagedPath “PWA2” -WebApplication $WebAppURL
New-SPSite -Url $SitePWA2URL -Template “PWA#0” -Name “Project Web App2” -OwnerAlias “DOMAIN\mawharton” -Verbose
Enable-SPFeature PWASITE -Url $SitePWA2URL -Verbose
Set-SPProjectPermissionMode -Url $SitePWA2URL -Mode ProjectServer -Verbose
Start $SitePWA2URL
#################################################
#  List Web Application
#################################################
Get-SPProjectWebInstance | Select URL , adminAccount, ProvisioningResult, Online | Sort-Object URL
#################################################
#  Delete PWA Site
#################################################
Remove-SPSite -Identity $SitePwaURL  -Confirm:$false -verbose     # Removes PWA site
Remove-SPSite -Identity $SitePwa2URL -Confirm:$false -verbose     # Removes PWA2 site
Remove-SPSite -Identity $SitePwaOOB  -Confirm:$false -verbose     # Removes PWAOOB site