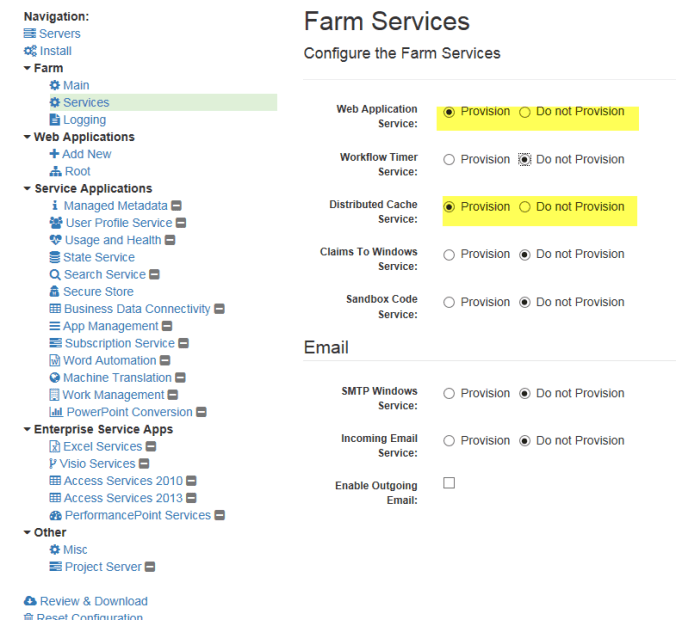
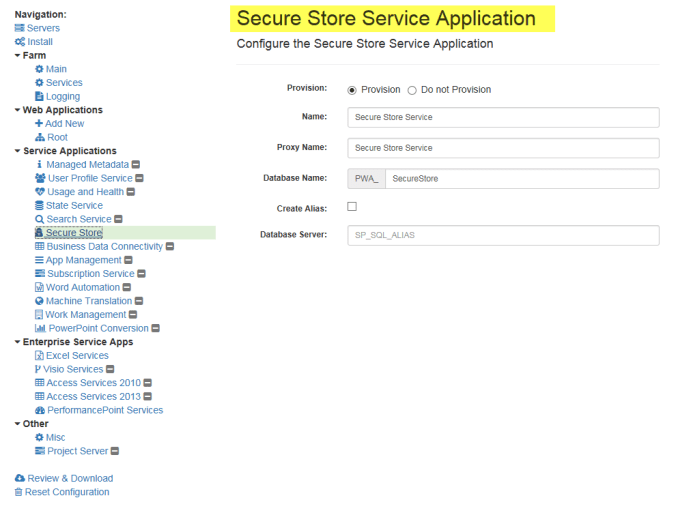
Installing Project Server using AutoSPInstaller

Wow!  For years I have been building PowerShell scripts to install and configure SharePoint and Project server.  It has worked well and have learned a lot about PowerShell in doing so.   However, I recently discovered a tool in CodePlex called AutoSPInstaller.   http://autospinstaller.codeplex.com/

My first reaction to this tool was the same as using SharePoint Products Configuration Wizard.  It couldn’t be that good and all being executed behind code.   When I finally looked at AutoSPInstaller and discovered that it was all based on PowerShell.  This perk my interested.

My first few attempts using AutoSPInstaller failed for me and my reaction was not very good.  However, I kept hearing about how others were using it and so I decided to give it another chance only this time, I took a little time in reading the documentation.  After examining the PowerShell code and using the “Build Farm” tool found at https://autospinstaller.com/ and with a successful installation of SharePoint and a configuration of SharePoint Farm; I WAS SOLD.

This is one of the best tools I have seen for building a SharePoint farm and documenting the farm.  And it also configures other useful items to make your farm more robust such as setting up SQL alias and disabling the loop check.  And it works for SharePoint and Project server 2010, 2013 and 2016.  I am consistently build different SharePoint scenarios in my lab and AutoSPInstaller automates the process of setting it up.

One other item, I should mention about AutoSPInstaller. If you want to learn more about PowerShell and see good examples of modules and well written code, then dig deep into the code.  I really like PowerShell and learning PowerShell techniques.  AutoSPInstaller is full of many PowerShell tricks.

Building the SharePoint Farm XML is done by jumping to the https://autospinstaller.com/ site and then clicking “Build a Farm”.   The following screen shot are for building a SharePoint farm that configures Project Server on a single server.  My configuration is for the very basics services that project server typically uses such as Excel Services, Secure Store, Performance Point Service and of course project server service.  I should point out project server service doesn’t always work after the installation and at times I have needed to de-provision and re-provision the project service to get it working.

SPAutoInstaller-Servers

Servers Page.  Its purpose is to define the servers in the SharePoint farm. If only one server is being setup for the farm, then leave servers list blank.  It requires either no servers or a minimum of two servers for the Share Point farm.

SPAutoInstaller-2-Options

Installation Options page.  The highlighted options are important to me.

SPAutoInstaller-3-Main

Farm – Configure the Main Farm Options

General settings for the SharePoint configuration.  I don’t like putting real password in the build farm tool, so I put in bogus passwords and replace them once I create the XML file.

I really like the database preview option.   It allows you to have all the SharePoint farm databases prefixed and makes it much easier for the DBA to organize the databases.

The create alias option is a nice feature for setting this up as well.  Makes it much easier to move SharePoint to another SQL server in the future.

I specify only a few managed accounts for project server deployment.  If setting up for SharePoint deployment, I would add all the account in this page.  It validates the username and passwords.

SPAutoInstaller-4-FarmServices

Farm Services is really depends on your requirements.  I will leave it at that.

SPAutoInstaller-5-FarmLogging

Farm Logging screen.  Take the default and change it later.  I had some issues, so now keep it as the default.

SPAutoInstaller-6-RootWeb

Root Web Application.  I change this up a little by just setting up a root.

SPAutoInstaller-7-stateService

For project server, I typically setup State Service, Secure Store, Excel Services and PerformancePoint Services.  Under the Other option are special settings for project server.


SPAutoInstaller-8-SecureStore


Miscellaneous Components.   Setting up the PDF content type has never been so easy.

SPAutoInstaller-9-ExcelServiceSPAutoInstaller-10-PerformancePointSPAutoInstaller-11-Miscelanous

SPAutoInstaller-12-ProjectService

Here is the final screen.  Word of caution is that the configuring project server doesn’t work for me.  I am going to look into the PowerShell and see what the problem is.  In the meanwhile, I would just letting it configure project server. Once it is complete, test to see if it works.  If project server doesn’t work properly then do the following

  1. De-provision PWA
  2. Delete the web application
  3. Reboot the server
  4. Create a new Project Server 2013 web application
  5. Provision PWA

Finally, I would like to thank Ivan Josipovic and Brian Lalancette for building and maintaining AutoSPInstaller on CodePlex. You can find out more about these guys at https://autospinstaller.com/Contact


How to change Domain when Migration from PS2010 to PS2013

Migration project server 2010 and 2013 can be challenging, however when changing the domain is part of the migration, then additional unsupported steps must be done. Basically the enterprise resource pool contains the user profile, along with the active directory account (domain). There are several SQL tables that need to be updated using a SQL update command to switch the domain reference. Also, the each enterprise profile has a GUID that points back to the AD GUID and this needs to be update.
The following SQL command will help you get thru that process. As always, this should be tested in an test environment prior to migrating to production.
​– UpdateDomainUsers

— Updates the following tables for domain user from OLDdomain to NEWdomain
— 1) PUB.MSP_RESOURCES
— 2) PUB.MSP_EPMRESOURCE
— 3) REPORT.MSP_EPMRESOURCE

USE ProjectWebApp

— First look at the what the domain name replace looks like
— Make sure that domain name matches the account used to create PWA

SELECT r.WRES_ACCOUNT
, REPLACE (LTRIM(r.WRES_ACCOUNT), ‘OLDdomain ‘, ‘NEWdomain’) as WReS2
, R.WRES_CLAIMS_ACCOUNT
, REPLACE (LTRIM(R.WRES_CLAIMS_ACCOUNT), ‘OLDdomain ‘, ‘NEWdomain’) as W2
, WRES_AD_GUID
FROM pub.MSP_Resources r
Where not r.WRES_ACCOUNT is null

— After a visual inspection, the tables can be updated
— Also, there may be a few accounts to exclude, such as the farm admin account
— We are also setting the WRES_AD_GUID to null, because during the resource sync,
— the GUID will get update to the new DOMAIN

UPDATE pub.MSP_Resources
SET WRES_ACCOUNT = REPLACE (LTRIM(WRES_ACCOUNT), ‘OLDdomain’, ‘NEWdomain’)
, WRES_CLAIMS_ACCOUNT = REPLACE (LTRIM(WRES_CLAIMS_ACCOUNT), ‘OLDdomain’, ‘NEWdomain’)
, WRES_AD_GUID = null
WHERE not WRES_ACCOUNT is null
AND WRES_CLAIMS_ACCOUNT <> ‘i:0#.w|OLDdomain\username1’
AND WRES_CLAIMS_ACCOUNT <> ‘i:0#.w|OLDdomain\username2’

— There may be a few other accounts that need to have the RES_AD_GUID updated

UPDATE pub.MSP_Resources
SET WRES_ACCOUNT = REPLACE (LTRIM(WRES_ACCOUNT), ‘OLDdomain’, ‘NEWdomain’)
, WRES_CLAIMS_ACCOUNT = REPLACE (LTRIM(WRES_CLAIMS_ACCOUNT), ‘OLDdomain’, ‘NEWdomain’)
, WRES_AD_GUID = null
WHERE WRES_CLAIMS_ACCOUNT = ‘i:0#.w|OLDdomain\username’

— Check out accounts records and verify update done correctly

select r.WRES_ACCOUNT
, R.WRES_CLAIMS_ACCOUNT
, WRES_AD_GUID
FROM pub.MSP_Resources r
Where not r.WRES_ACCOUNT is null

— MSP_EpmResource table needs the same care for updating domains

SELECT
ResourceNTAccount
, UserClaimsAccount
FROM dbo.MSP_EpmResource R

— After visual inspection, then update the records

select
ResourceNTAccount
, REPLACE (LTRIM(r.ResourceNTAccount), ‘OLDdomain’, ‘NEWdomain’) as WReS2
, R.UserClaimsAccount
, REPLACE (LTRIM(R.UserClaimsAccount), ;OLDdomain’, ‘NEWdomain’) as W2
FROM dbo.MSP_EpmResource R


UPDATE MSP_EpmResource
SET ResourceNTAccount = REPLACE (LTRIM(ResourceNTAccount), ‘OLDdomain’, ‘NEWdomain’)
, UserClaimsAccount = REPLACE (LTRIM(UserClaimsAccount), ‘OLDdomain’, ‘NEWdomain’)
WHERE not ResourceNTAccount is null
–AND WRES_CLAIMS_ACCOUNT <> ‘i:0#.w|OLDdomain\username1’
–AND WRES_CLAIMS_ACCOUNT <> ‘i:0#.w|OLDdomain\username2’


SELECT
ResourceNTAccount
, UserClaimsAccount
FROM dbo.MSP_EpmResource R

——————————————-

— With Project 2010 the reporting database may need updates as well

SELECT [ResourceUID]
,[ResourceName]

,[ResourceType]
,[ResourceNTAccount]
,[ResourceIsActive]
FROM [ProjectServer_Reporting].[dbo].[MSP_EpmResource]
where ResourceNTAccount IS NOT NULL


SELECT
ResourceNTAccount
, REPLACE (LTRIM(r.ResourceNTAccount), ‘OLDdomain’, ‘NEWdomain’) as WReS2
FROM [ProjectServer_Reporting].[dbo].[MSP_EpmResource] R

UPDATE [ProjectServer_Reporting].[dbo].[MSP_EpmResource]
SET ResourceNTAccount = REPLACE (LTRIM(ResourceNTAccount), ‘OLDdomain’, ‘NEWdomain’)
WHERE not ResourceNTAccount is null